General Winemaking Instructions
You must enjoy wine if you are deciding to make your own. Now you will have even more pleasure when you take that first sip of your own wine. The easiest way to begin making wine is from wine concentrates. They come in many varieties, and while most come from California, we also have concentrates from France, Italy, Germany, Australia, and Chile. To make the concentrate wines you only have to follow the simple directions included inside the box. The ingredients are conveniently put into packs which you add when directed to. Following the instructions you will have wine to drink in as little as 4-5 weeks.
You can also make wine from fresh fruit. Making country wines has a very long history. Mankind has been making wine for thousands of years. (It happens to be an efficient way of preserving summer fruit for winter consumption.) And it gladdens the heart. To ferment fresh fruit you only need 6 simple ingredients in addition to your Equipment Kit – yeast, nutrient, acid blend, tannin, pectic enzyme, and Campden tablets. These are the most common ingredients called for in most any fruit or vegetable wine. We have a free recipe sheet handout in addition to many wine recipe books for sale.
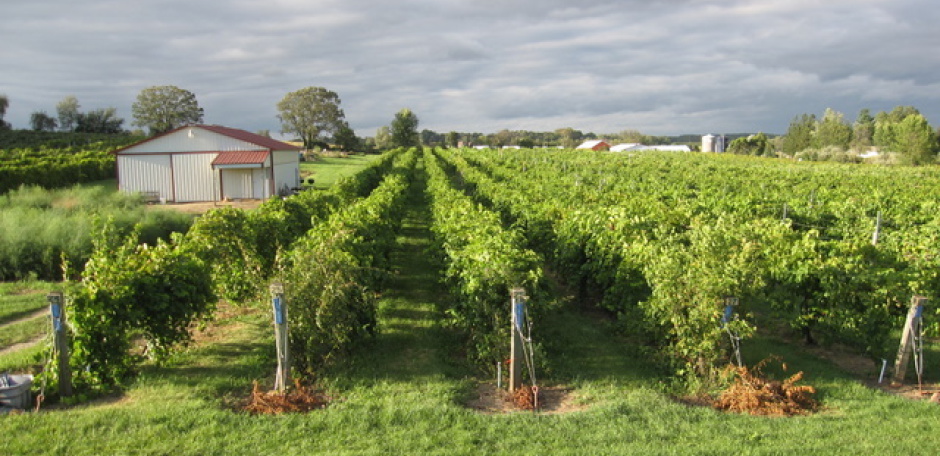
Mitchell Vineyard. You can also make wine from local winemaking grapes. Mitchell Vineyard, located south of Madison near Oregon, Wi., is currently growing 10 different varieties of grapes: Foch, Millot, Frontenac, Delaware, Traminette, Esprit, St. Pepin, LaCrescent, Prairie Star, and Concord. Each Fall from early September to mid October, grapes are available to be picked by winemakers wishing to make their own grape wine. Crushers and presses are available at the vineyard for customers’ use to make their winemaking easier. Sugar and acid readings are also available from the vineyard.
What is needed:
Primary Fermenter– Plastic and usually 1-7 gallons, or several gallons larger in volume than the amount of wine being made.
Glass carboy—1, 3, 5, 6, or 6.5 gallon. This is the secondary fermenter and is the same size as the amount of wine you make.
Fermentation lock—this device is usually plastic and allows Co2 to escape during fermentation. It is filled half full of water and attached to the secondary fermenter.
Rubber Stopper—This stopper is drilled with a hole into which you put your fermentation lock. It is then put into the top of the glass secondary fermenter.
Siphon Tubing—this is used to siphon wine from one container to another.
One-Step Sanitizer—this is a good, no-rinsing necessary, all-purpose cleaner and sanitizer. We recommend this for
What is helpful:
Hydrometer– this simple instrument measures sugar content (alcohol indirectly) and tells you how much sugar to add to your juice to get a certain amount of alcohol, or it tells you how much sugar you already have in your juice, or remaining in your wine.
Racking Tube– this is attached to your tubing and allows siphoning without picking up much sediment
Bottle Filler—this plastic device attaches to the tubing and once the wine has begun flowing it is pushed into the bottom of the bottle and fills the bottle. When the filler is raised it holds the siphon, and can be placed into the next bottle.
Bottle Brush—for scrubbing the insides of your less than sparkling bottles.
Winemaking Overview—follow specific Kit directions found in your kit box or on your recipe.
1. Sanitize! This is perhaps the most important step. In every step you will probably be asked to sanitize some piece of equipment. For the first step you will need to sanitize your primary fermenter, the lid for the fermenter, the bubbler airlock, and something to stir with. Generally, you sanitize everything that will come into contact with your wine.
2. Using juices or concentrates: Mix the contents of the large bag of juices and extracts with the appropriate amount of water as found in the instructions that should come with your kit wine. The juices and water should be mixed very well using a sanitized spoon or paddle. At this point your kit may instruct you to add other ingredients to this mixture such as oak chips or bentonite clay. Please follow these instructions. Concerning water: it is best to use water that is free from chlorine. We recommend some sort of purified water such as carbon filtered, reverse osmosis
filtered, or distilled water. Otherwise one can heat municipal water to a simmer and after cooling it may be used without worrying about chlorine.
Using Fresh Fruit If you are using fresh fruit you will need to have a recipe for that particular fruit. Always start with clean, good, fresh fruit. The higher the quality of the fruit, the higher the quality of the wine. Remember, great wine is made in the vineyard! You will need to then crush the fruit, add the water and sugar called for, then the rest of the ingredients, usually, but not always– acid blend, nutrient, pectic enzyme, tannin, Campden tablets, and yeast. After fermentation begins you will often separate the fruit skins from the fermenting juice by using nylon bags or a wine press. The wine is usually then placed into the secondary fermenter with a fermentation lock attached. You should rack the wine from the sediment at month intervals till it is time to bottle. You must judge when to bottle by observation. You will want to make sure fermentation is finished, the wine is clear and bright, and you have racked often enough to ensure there is no sediment in your wine. Also, keep your sulfite levels constant by the addition of small amounts of Campden tablets during some or all of the rackings. There are many good winemaking books available for more information.
3. Once the must has been prepared (must is the juice you have prior to fermentation), it is time to add the yeast and begin the primary fermentation. Most kits will include dry yeast. Most dry yeast will have an expiration date. Before you make the wine be sure to check this date and make sure that you do not have to go and get fresher yeast. In general it is best to re-hydrate the yeast in a cup of warm water. The water should be between 95°F and 105°F. Pour the dry yeast onto the surface of the water, wait 15 minutes, and then stir the yeast into the water. The yeast can then be poured into the must. You should see signs of fermentation within 12-36 hours. You should see foam on the surface. Initially it will be spotty but should eventually cover the surface of the wine.
4. Corking and aging. After the primary and secondary fermentations have been completed, and the wine is clear and stabilized according the kits instructions it is time to fill your bottles with wine and cork the bottles.
Most kits produce 6 gallons of wine and will produce approximately 30, 750ml wine bottles. Be sure to sanitize your bottles!
Sanitation
Sanitation is one of the most important steps in home beer and wine production. Most flaws in home made beer and wine can be traced back to improper sanitation. There are a wide range of bacteria and wild yeast that can cause beer or wine to form bad flavors, and while the alcohol in wine and beer will kill all infectious organisms, it does not always prevent the spoiling of beer or wine. It is a big disappointment to discover that your work, time, skill, and money have been wasted producing a bad batch just because you did not spend the few extra minutes and cents that it takes to sanitize properly.
Rinsing
All tap water, even chlorinated municipal tap water, contains bacteria. This bacteria is normally not harmful to people who drink it, however it can be a potential source of contamination in beer or winemaking. The best way to combat the bacteria in tap water is to not rinse your equipment after sanitizing it. This can be accomplished by using a no-rinse sanitizer. These sanitizers are very effective against bacteria, but harmless to people when ingested in dilute concentrations.
What needs to be sanitized?
Nearly everything that comes into contact with beer or wine should be sanitized. This includes fermenters, tubing, spoons, rubber stoppers, fermentation locks and bottles. However, it is not necessary to sanitize such items as fruit presses or strainers that contact the fruit must prior to adding sulphite (Campden tablets) to the must
Using One Step
Our kits don’t come with the One-Step sanitizer. We include Campden Tablets (Sodium or Potassium Bisulfite) instead since this may also be used as a sterilizer (10 crushed tablets /pint of water). Sulfite has little cleaning properties so one may want to use One-Step as a cleaner/
1. Prepare a dilute solution of One Step by mixing it with warm water. Use one tablespoon per gallon of warm water. Stir to dissolve the powder.
2. Fill any clean container such as plastic bin, plastic fermenter or glass carboy with the solution, and immerse any other items that need sanitizing in the solution. Any hose should be fed into the solution so that the entire hose fills with solution.
3. Allow two minutes of contact time.
4. Drain or dump out the solution, no rinsing is required. Make sure that any surface you put your sanitized items on is also sanitized. Tip: sanitize the lid to a plastic fermenter and place it upside down on your counter. Now you have a sanitized surface for all your other sanitized items to lay on, and both the lid and
the items will remain sanitized!
5. You may wish to find a few buckets or other containers in which to sanitize any utensils, bottles, or pieces of tubing. One-Step solution will lose its ability to sanitize as it ages. Always make a fresh solution of One-Step every time you sanitize.
Primary and Secondary Fermentation in Wine
Once you have added your yeast it is time to seal up your fermenter and wait. Winemakers generally use a ‘two-stage winemaking process. In the primary fermenter (plastic container) the yeast reproduce rapidly and quickly form a layer of dead and dormant yeast on the bottom of the fermenter. If the wine sits on this layer for an extended period of time the wine may pick up a "yeasty" or "musty” flavor. Within 4-7 days you will be able to siphon the wine off of this layer of yeast and into a secondary fermenter (the 6 gallon carboy). The layer of dead yeast can then be disposed of as you clean your primary fermenter. The glass carboy does not permit the passage of oxygen as most plastic does, and in the later stages of wine fermentation it becomes critical to keep the exposure of the wine to air and oxygen to a minimum.
Step by step instructions
1. Snap the sanitized lid on to the top of the 7.5 gallon fermenter.
2. Place approximately 1-2 tablespoons of water into the airlock (the small plastic device) and insert the stem of the airlock into the grommet in the lid.
3. Place the fermenter in a dark area where the temperature will be stable and in the 65º-75º F range.
4. Read the instructions that came with the specific wine ingredient kit. Usually the instructions will ask you to
transfer the fermenting wine from the primary fermenter to a secondary fermenter after around one week. Make sure to sanitize the # 7 drilled rubber stopper and insert the airlock, still filled with 1-2 tablespoons of water, into the stopper and place the stopper into the neck of the 6 gallon carboy once it has been filled with your wine.
5. The specific instructions included in your wine ingredient kit may call for you to take specific gravity readings. The kit contains a hydrometer for taking these readings.
Using the hydrometer: Simply fill the hydrometer's storage tube (or use a hydrometer test jar, which is a little easier to use) up 3/4 of the way with a sample of your wine. You need enough in your jar so the hydrometer will float. If you have the basic kit you will want to sanitize your siphoning equipment and use a siphon to collect your sample of wine. Simply place the siphon hose into the fermenter, place your finger over the upside end, and withdraw a sample of wine and place it into your hydrometer sample jar. (A wine thief may also be used for drawing samples).
Reading the Hydrometer is simple. Simply float the hydrometer, weighted side down, in the sample of your wine. On the stem of the hydrometer is a scale that reads in Balling, Specific Gravity, and Potential Alcohol.
Where the surface of the wine meets the floating stem of the hydrometer is where to read the scale. Hydrometers will read differently at different temperatures. The hydrometer supplied with your kit reads correctly when the wine is at 60ºF.
Hydrometer readings tell you a lot about how your wine is fermenting. As the yeast ferments the sugars in your wine, the sugars are transformed into alcohol and CO2 gas. This causes the specific gravity of your fermenting wine to drop as fermentation progresses. If you take a hydrometer reading before the beginning of fermentation, and after the end of fermentation, you will be able to determine approximately how much sugar has fermented into alcohol, and approximately what the alcohol content of your wine is.
6. Once the wine has been in the glass carboy for the times recommended by the specific wine ingredient kit, it
is time to bottle. At this point the wine should be crystal clear. It is now time to bottle your wine.
Transferring Wine, also known as ‘racking”
From a carboy to another vessel
1. Sanitize the vessel you are transferring into along with
• 6 feet or more of 3/8" ID vinyl tubing.
2. Insert the tubing into the carboy filled with your beer or wine. Place your containers side by side then elevate the full one (watch your back!) so that the bottom of the full one is higher than the top of the empty one. Ideally you should put it on a chair or something rather than try to hold it up for the duration. Insert the sterilized hose into the full container until it's about half way down. Now bend over so that your mouth is beside the empty container, place the hose in your mouth and suck big time. Keep sucking (just like using a straw) until the juice comes pouring down the hose. Quickly switch the hose over to the empty container and let gravity fill it for you. Watch the hose in the full container ensuring that the end is always below the surface. If it sucks air, you may have to perform the sucking process all over again (not a bad deal if the wine already tastes good).
Alternatively, you may fill the tubing with sterilized water, and insert one end into the wine while holding a finger over the other end. Lower the end with your finger into the empty vessel so it is lower than the filled vessel and release your finger. The small amount of water will flow out and the wine will follow, as if by magic. Gravity is grand!
From a bucket (or kettle) without a spigot to another vessel
1. Sanitize the vessel you are transferring into. Also sanitize:
• A racking cane (the rigid plastic tube with the bend in the top)
• 6 feet or more of 3/8” ID vinyl tubing.
2. Attach the vinyl tubing to the bent end of the racking tube.
3. Place the bottom end of the racking tube into the container with wine in it.
4. Place the end of the vinyl tube to the bottom of the vessel you will be transferring into, and place this vessel below the level of your bucket. Here are two ways to start a siphon:
• Sanitize your mouth with an antibacterial mouthwash, or strong neutral grain spirit, and then suck on the end of the vinyl tubing like a straw, and once the tube is filled with your wine or beer put the end of the tube back into the receiving vessel.
Or:
• Before placing the tube and cane into your bucket and receiving vessel, fill the tube and cane with sanitary water (we recommend water that has been boiled and then cooled). Hold your thumb over the end of tubing to keep the hose and cane filled with water while you place the cane into your bucket and the hose into your receiving vessel. Then release your thumb or the clamp to begin the siphon.
Transferring from a bucket with a spigot to another vessel:
1. Sanitize the vessel you are transferring into along with a 3 foot or longer piece of 3/8" ID vinyl tubing.
2. Attach the vinyl tubing to the end of the spigot and put the other end in the other vessel. Make sure your bucket is above the level of your other vessel and that the vinyl hose goes to the bottom of that vessel.
3. Open the spigot.
Bottling and Corking
1. Sanitize! Sanitize all equipment that will contact the wine: bottling bucket, racking tube, siphon hose, bottle filler, and bottles. Bleach is not recommended as a sanitizer during the end process.
2. Add any necessary additives. Some wine ingredient kits may have additives added at bottling. Refer to your kit's
instructions.
3. Assemble the siphoning equipment and start the siphon.
4. Take a hydrometer reading.
5. Fill the bottles. Insert the bottle filler into an empty bottle. To start the flow, hold the filler down. To stop the flow, release the filler. Try to leave 2 inches of headspace in each bottle.
6. Cork the bottles. If using a floor corker, stand the bottle on the platform and push the lever down — that's it. If you don't have a floor corker, it can be very difficult to insert dry corks. Corks can be softened beforehand, using one of these methods: 1. Store them for a few days inside an airtight bucket (with the lid on) with an open wine bottle halfway full of sulfite solution; 2. Dip them in a solution of 1 cup lukewarm water and 1 tablespoon glycerin right before corking; 3. Steam the corks for a few minutes in a colander over a pot of boiling water. Don't soak or boil the corks, as this can soften them too much and cause crumbling.
8. Conditioning. After the bottles are corked, stand them upright for three days. This allows the air that was
pushed into the bottle by the cork to seep back out and the bottle pressure to equalize. After three days, the bottles can be laid on their sides for long term storage.
A word about corks
Choose good corks. Cheap corks will not form a good seal, which can lead to leaking bottles or even spoiled wine. Most corks are made from the bark of a type of oak tree, but some corks are synthetic and made of plastic. Whatever they're made out of, good corks should be smooth, straight, with a minimum of cracks or fissures. If you plan to cellar your bottles for more than a year, use the best corks you can. Select the right size cork for your bottles. Corks come in various lengths and diameters. Longer corks provide a better seal and are better for long term storage; shorter corks are suitable for wines that will be consumed quickly.
Cork Size: # 9 corks are the standard for 750 ml or larger bottles. # 8 corks can be used for screw cap bottles. # 7 may be used in champagne bottles.
Corkers: Floor corkers are the easiest to use corkers. We highly recommend them. They may cost more initially but the pleasure and ease of using them outweighs any displeasure at the initial outlay. And they have far more charm.
Additional Comments
Winexpert wine kits are formulated to make 6 gallons of wine. The company insists the wines turn out better that way than if 5 gallons are made with them. Use your judgment here.